Ceph是统一存储,包括块、文件、对象。其中块存储必须映射给linux内核,然后才能用,而内核客户端代码的更新收到了linus的限制,已经好久没更新了。librbd又不能直接用,不过道是可以用nbd映射一下使用。cephfs目前还不太适合生产环境。目前*nix对nfs的支持还是很全面的,而对librbd、cephfs的支持就是大不一样了。so,使ceph支持nfs协议很有意义了,but!ceph是分布式存储,被ganesha一搞,出现了单节点问题,所以只能想办法从HA角度解决了,这也是一种无奈,唉。。。
(~~一丝光~~)从nfs v4.1开始支持并行存储,这或许是一缕新曙光。
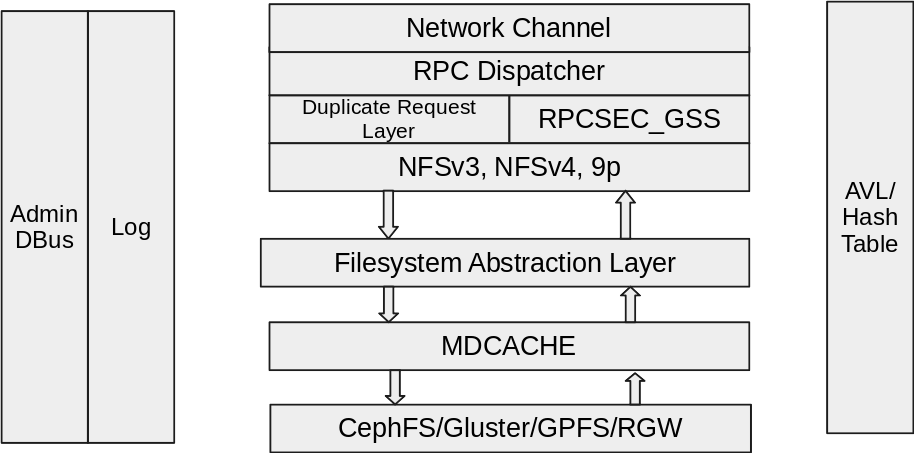
NFS-Ganesha架构
实施 RGW搭建 关于RGW的安装搭建请于Ceph官网 查看
用户创建 创建一个S3用户专门服务于nfs-ganesha
1
2
3
4
5
6
7
8
9
10
11
12
13
14
15
16
17
18
19
20
21
22
23
24
25
26
27
28
29
30
31
32
33
$ sudo radosgw-admin --uid=nfs_ganesha_user --display="User for NFS-Ganesha" { "user_id": "nfs_ganesha_user", "display_name": "User for NFS-Ganesha", "email": "", "suspended": 0, "max_buckets": 1000, "auid": 0, "subusers": [], "keys": [ { "user": "nfs_ganesha_user", "access_key": "xxxxxxxxxxxxxxxxxxxx", "secret_key": "XXXXXXXXXXXXXXXXXXXXXXXXXXXXXXXXXXXXXXXX" } ], "swift_keys": [], "caps": [], "op_mask": "read, write, delete", "default_placement": "", "placement_tags": [], "bucket_quota": { "enabled": false, "max_size_kb": -1, "max_objects": -1 }, "user_quota": { "enabled": false, "max_size_kb": -1, "max_objects": -1 }, "temp_url_keys": [] }
user、access_key、secret_key是后续nfs-ganesha配置是需要使用到的。
nfs-ganesha编译部署 获取Project 1 2 3 4 5 6 7 8 9 // clone nfs-ganesha project $ git clone https://github.com/nfs-ganesha/nfs-ganesha.git $ cd ./nfs-ganesha// 切换到v2.4 stable版本 $ git checkout V2.4-stable // 获取submodule libntirpc $ git submodule update --init
在正式开始编译前,需要安装一些包,libntirpc强制使用了GSS,使用-DUSE_GSS=OFF是不能关闭GSS使用的。所以在编译nfs-ganesha时不需要关闭GSS。krb5-libs-1.14.1-27.el7_3.x86_64、krb5-devel-1.14.1-27.el7_3.x86_64、libgssglue-0.4-2.el7.nux.x86_64、libgssglue-devel-0.4-2.el7.nux.x86_64
编译安装 1 2 3 4 5 6 7 8 9 10 11 12 13 14 15 16 17 18 19 20 21 22 23 24 25 // libntirpc 编译 $ cd ./nfs-ganesha/src/libntirpc$ cmake ./ ... $ make ... // nfs-ganesha 编译 $ cd ./nfs-ganesha$ mkdir ./build$ cd ./build$ cmake -DUSE_NLM=OFF -DRGW_PREFIX=/usr -DUSE_FSAL_RGW=ON -DUSE_FSAL_CEPH=OFF -DCMAKE_INSTALL_PREFIX=/home/xxxxx/.local -DUSE_GSS=ON -DUSE_FSAL_ZFS=OFF -DUSE_NFSIDMAP=OFF -DUSE_FSAL_GLUSTER=OFF ../src ... $ make ... $ make install ... // 为了能让ganesha正常运行,需要更新一下ld.cache,保证动态库可以正常加载 $ sudo echo "/home/xxxxx/.local/lib64/ganesha" >> /etc/ld.so.conf$ sudo ldconfig -v//生成RPM包 $ cpack -G RPM ...
配置启动 配置RGW的Keyring librgw 访问ceph时会用到keyring,它回去/var/lib/ceph/radosgw/ceph-admin这个目录下去找keyring,这个目录需要用户自己创建并,copy一个keyring进去,这个keyring可以是admin,也可以是rgw实用的keyring,从权限管理角度建议使用rgw的keyring
撰写ganesha.conf.rgw 1 2 3 4 5 6 7 8 9 10 11 12 13 14 15 16 17 18 19 20 21 22 23 24 25 26 27 28 29 30 31 32 33 34 35 36 37 38 39 40 41 42 ################################################### # # EXPORT # # To function, all that is required is an EXPORT # # Define the absolute minimal export # ################################################### EXPORT { # Export Id (mandatory, each EXPORT must have a unique Export_Id) Export_Id = 1; # Exported path (mandatory) Path = "nfs_bucket"; # Pseudo Path (required for NFS v4) Pseudo = "/nfs_bucket"; # Required for access (default is None) # Could use CLIENT blocks instead Access_Type = RW; Protocols = 4; Transports = TCP; # Exporting FSAL FSAL { # Name = VFS; Name = RGW; User_Id = "xxxxxxxxxxx"; Access_Key_Id = "xxxxxxxxxxxxxxxxxxxx"; Secret_Access_Key = "xxxxxxxxxxxxxxxxxxxxxxxxxxxxxxxxxxxxxxxx"; } } RGW { ceph_conf = "/etc/ceph/ceph.conf"; name = "client.admin"; cluster = "ceph"; }
运行ganesha进程 1 sudo ganesha.nfsd -f /home/xxxxx/.local/etc/ganesha/ganesha.conf.rgw -F -L /var/log/ganesha.log
客户端连接 1 sudo mount -t nfs4 192.168.1.82:/nfs_bucket /mnt
docker容器部署 镜像 ananace/nfs-ganesha-ceph
gannesha配置 配置上来讲与编译部署没有太大差别
1 2 3 4 5 6 7 8 9 10 11 12 13 14 15 16 17 18 19 20 21 22 23 24 25 26 27 28 29 30 31 32 33 34 35 # NFS protocol options EXPORT { # Export Id (mandatory, each EXPORT must have a unique Export_Id) Export_Id = 77; # Exported path (mandatory) Path = /; # Pseudo Path (for NFS v4) Pseudo = /; # Access control options Access_Type = RW; Squash = No_Root_Squash; # NFS protocol options SecType = "sys"; Transports = TCP; Protocols = 4; # Exporting FSAL FSAL { Name = RGW; User_Id = "admin"; Access_Key_Id = "8I4K2USDV5SK3UFLQUB0"; Secret_Access_Key = "A4JuvB468tmnDpmkZMfwesb2zmGZeSiCJlzJMALc"; } } RGW { cluster = "ceph"; ceph_conf = "/etc/ceph/ceph.conf"; name = "client.rgw.host-10-100-13-111"; }
运行ganesha容器 由于Ganesha 的 FSAL 使用到了librgw,所以在镜像中会装好ceph-common、librgw2等。
1 docker run -d --net=host -v /home/xxx/ceph/etc_ceph/:/etc/ceph:ro -v /home/xxx/ceph/ganesha/:/etc/ganesha:ro -v /home/xxx/ceph/var_lib_ceph/:/var/lib/ceph --name nfs -e GANESHA_BOOTSTRAP_CONFIG=no ananace/nfs-ganesha-ceph
docker 启动是需要设置环境变量GANESHA_BOOTSTRAP_CONFIG=no,默认配置为yes;若为yes的化,nfs-ganesha在启动的时候会重置/etc/ganesha/ganesha.conf配置文件。
参考&鸣谢