# geth --datadir ./eth-data --allow-insecure-unlock --http --http.addr 172.17.0.2 --http.api "admin,debug,web3,eth,txpool,personal,ethash,miner,net" --http.corsdomain "*" --dev init genesis.json INFO [11-07|16:04:14.139] Maximum peer count ETH=50 LES=0 total=50 INFO [11-07|16:04:14.151] Smartcard socket not found, disabling err="stat /run/pcscd/pcscd.comm: no such file or directory" INFO [11-07|16:04:14.179] Set global gas cap cap=50,000,000 INFO [11-07|16:04:14.190] Allocated cache and file handles database=/root/eth-data/geth/chaindata cache=16.00MiB handles=16 INFO [11-07|16:04:14.224] Opened ancient database database=/root/eth-data/geth/chaindata/ancient/chain readonly=false INFO [11-07|16:04:14.226] Writing custom genesis block INFO [11-07|16:04:14.230] Persisted trie from memory database nodes=0 size=0.00B time="347µs" gcnodes=0 gcsize=0.00B gctime=0s livenodes=1 livesize=0.00B INFO [11-07|16:04:14.238] Successfully wrote genesis state database=chaindata hash=a697c6..9bf39b INFO [11-07|16:04:14.238] Allocated cache and file handles database=/root/eth-data/geth/lightchaindata cache=16.00MiB handles=16 INFO [11-07|16:04:14.259] Opened ancient database database=/root/eth-data/geth/lightchaindata/ancient/chain readonly=false INFO [11-07|16:04:14.259] Writing custom genesis block INFO [11-07|16:04:14.261] Persisted trie from memory database nodes=0 size=0.00B time="21.917µs" gcnodes=0 gcsize=0.00B gctime=0s livenodes=1 livesize=0.00B INFO [11-07|16:04:14.262] Successfully wrote genesis state database=lightchaindata hash=a697c6..9bf39b
# geth --datadir ./eth-data --networkid 110 --allow-insecure-unlock --http --http.addr 172.17.0.2 --http.api "admin,debug,web3,eth,txpool,personal,ethash,miner,net" --http.corsdomain "*" --dev INFO [11-07|16:14:23.231] Starting Geth in ephemeral dev mode... WARN [11-07|16:14:23.234] You are running Geth in --dev mode. Please note the following:
1. This mode is only intended for fast, iterative development without assumptions on security or persistence. 2. The database is created in memory unless specified otherwise. Therefore, shutting down your computer or losing power will wipe your entire block data and chain state for your dev environment. 3. A random, pre-allocated developer account will be available and unlocked as eth.coinbase, which can be used for testing. The random dev account is temporary, stored on a ramdisk, and will be lost if your machine is restarted. 4. Mining is enabled by default. However, the client will only seal blocks if transactions are pending in the mempool. The miner's minimum accepted gas price is 1. 5. Networking is disabled; there is no listen-address, the maximum number of peers is set to 0, and discovery is disabled. INFO [11-07|16:14:23.251] Maximum peer count ETH=50 LES=0 total=50 INFO [11-07|16:14:23.261] Smartcard socket not found, disabling err="stat /run/pcscd/pcscd.comm: no such file or directory" INFO [11-07|16:14:23.291] Set global gas cap cap=50,000,000 INFO [11-07|16:14:23.649] Using developer account address=0xA9CB6DB62D6673ae5CD79D0d29796Dd9DF1d1A5e INFO [11-07|16:14:23.652] Allocated cache and file handles database=/root/eth-data/geth/chaindata cache=512.00MiB handles=524,288 readonly=true INFO [11-07|16:14:23.675] Opened ancient database database=/root/eth-data/geth/chaindata/ancient/chain readonly=true INFO [11-07|16:14:23.691] Allocated trie memory caches clean=154.00MiB dirty=256.00MiB INFO [11-07|16:14:23.691] Allocated cache and file handles database=/root/eth-data/geth/chaindata cache=512.00MiB handles=524,288 INFO [11-07|16:14:23.756] Opened ancient database database=/root/eth-data/geth/chaindata/ancient/chain readonly=false INFO [11-07|16:14:23.763] INFO [11-07|16:14:23.764] --------------------------------------------------------------------------------------------------------------------------------------------------------- INFO [11-07|16:14:23.764] Chain ID: 110 (unknown) INFO [11-07|16:14:23.764] Consensus: unknown INFO [11-07|16:14:23.764] INFO [11-07|16:14:23.765] Pre-Merge hard forks: INFO [11-07|16:14:23.765] - Homestead: 0 (https://github.com/ethereum/execution-specs/blob/master/network-upgrades/mainnet-upgrades/homestead.md) INFO [11-07|16:14:23.765] - Tangerine Whistle (EIP 150): 0 (https://github.com/ethereum/execution-specs/blob/master/network-upgrades/mainnet-upgrades/tangerine-whistle.md) INFO [11-07|16:14:23.765] - Spurious Dragon/1 (EIP 155): 0 (https://github.com/ethereum/execution-specs/blob/master/network-upgrades/mainnet-upgrades/spurious-dragon.md) INFO [11-07|16:14:23.765] - Spurious Dragon/2 (EIP 158): 0 (https://github.com/ethereum/execution-specs/blob/master/network-upgrades/mainnet-upgrades/spurious-dragon.md) INFO [11-07|16:14:23.765] - Byzantium: <nil> (https://github.com/ethereum/execution-specs/blob/master/network-upgrades/mainnet-upgrades/byzantium.md) INFO [11-07|16:14:23.765] - Constantinople: <nil> (https://github.com/ethereum/execution-specs/blob/master/network-upgrades/mainnet-upgrades/constantinople.md) INFO [11-07|16:14:23.765] - Petersburg: <nil> (https://github.com/ethereum/execution-specs/blob/master/network-upgrades/mainnet-upgrades/petersburg.md) INFO [11-07|16:14:23.766] - Istanbul: <nil> (https://github.com/ethereum/execution-specs/blob/master/network-upgrades/mainnet-upgrades/istanbul.md) INFO [11-07|16:14:23.766] - Berlin: <nil> (https://github.com/ethereum/execution-specs/blob/master/network-upgrades/mainnet-upgrades/berlin.md) INFO [11-07|16:14:23.766] - London: <nil> (https://github.com/ethereum/execution-specs/blob/master/network-upgrades/mainnet-upgrades/london.md) INFO [11-07|16:14:23.766] INFO [11-07|16:14:23.766] The Merge is not yet available for this network! INFO [11-07|16:14:23.766] - Hard-fork specification: https://github.com/ethereum/execution-specs/blob/master/network-upgrades/mainnet-upgrades/paris.md INFO [11-07|16:14:23.766] --------------------------------------------------------------------------------------------------------------------------------------------------------- INFO [11-07|16:14:23.766] INFO [11-07|16:14:23.768] Disk storage enabled for ethash caches dir=/root/eth-data/geth/ethash count=3 INFO [11-07|16:14:23.768] Disk storage enabled for ethash DAGs dir=/root/.ethash count=2 INFO [11-07|16:14:23.769] Initialising Ethereum protocol network=1337 dbversion=8 INFO [11-07|16:14:23.779] Loaded most recent local header number=0 hash=a697c6..9bf39b td=0 age=53y7mo1w INFO [11-07|16:14:23.780] Loaded most recent local full block number=0 hash=a697c6..9bf39b td=0 age=53y7mo1w INFO [11-07|16:14:23.780] Loaded most recent local fast block number=0 hash=a697c6..9bf39b td=0 age=53y7mo1w INFO [11-07|16:14:23.786] Loaded local transaction journal transactions=0 dropped=0 INFO [11-07|16:14:23.786] Regenerated local transaction journal transactions=0 accounts=0 INFO [11-07|16:14:23.791] Gasprice oracle is ignoring threshold set threshold=2 WARN [11-07|16:14:23.798] Engine API enabled protocol=eth WARN [11-07|16:14:23.798] Engine API started but chain not configured for merge yet INFO [11-07|16:14:23.802] Starting peer-to-peer node instance=Geth/v1.10.26-stable-e5eb32ac/linux-amd64/go1.18.5 WARN [11-07|16:14:23.802] P2P server will be useless, neither dialing nor listening INFO [11-07|16:14:23.843] New local node record seq=1,667,808,816,313 id=321fce2047223769 ip=127.0.0.1 udp=0 tcp=0 INFO [11-07|16:14:23.844] Started P2P networking self=enode://2d0246c1dd51623d6d8a8581095c033542366037b1e20ff815ad045af396de50df60f4aa9556148c2f4a89673bad5cab5c2ab22f3075d5bacba1b2fbebaf72e5@127.0.0.1:0 INFO [11-07|16:14:23.848] IPC endpoint opened url=/root/eth-data/geth.ipc INFO [11-07|16:14:23.852] Loaded JWT secret file path=/root/eth-data/geth/jwtsecret crc32=0xef39c4cb INFO [11-07|16:14:23.856] HTTP server started endpoint=172.17.0.2:8545 auth=false prefix= cors= vhosts=localhost INFO [11-07|16:14:23.862] WebSocket enabled url=ws://127.0.0.1:8551 INFO [11-07|16:14:23.862] HTTP server started endpoint=127.0.0.1:8551 auth=true prefix= cors=localhost vhosts=localhost INFO [11-07|16:14:23.868] Transaction pool price threshold updated price=0 INFO [11-07|16:14:23.868] Updated mining threads threads=0 INFO [11-07|16:14:23.868] Transaction pool price threshold updated price=1 INFO [11-07|16:14:23.868] Etherbase automatically configured address=0xA9CB6DB62D6673ae5CD79D0d29796Dd9DF1d1A5e INFO [11-07|16:14:23.875] Commit new sealing work number=1 sealhash=6ca53b..19dc17 uncles=0 txs=0 gas=0 fees=0 elapsed=6.285ms INFO [11-07|16:14:23.877] Commit new sealing work number=1 sealhash=6ca53b..19dc17 uncles=0 txs=0 gas=0 fees=0 elapsed=8.056ms
networkid
--networkid参数需要与genesis.json配置文件中的chainId值一致。
http.api
若--http.api设置错误会出现如下错误
1
ERROR[11-07|16:13:36.346] Unavailable modules in HTTP API list unavailable=[db] available="[admin debug web3 eth txpool personal ethash miner net]"
需要按照available中规定的内容进行配置--http.api参数。
attach交互
接下来需要attach到以太坊节点,在geth节点启动过程中有这样一条日志
1
INFO [11-07|16:14:23.848] IPC endpoint opened url=/root/eth-data/geth.ipc
没错,你猜对了,就是要用这个endpoint进行attach
1 2 3 4 5 6 7 8 9 10 11
# geth attach ipc:/root/eth-data/geth.ipc Welcome to the Geth JavaScript console!
INFO [11-07|17:59:54.021] Successfully sealed new block            number=1 sealhash=84eaaa..f4d2c5 hash=925c9a..d8cb75 elapsed=1h30m51.894s
INFO [11-07|17:59:54.022] 🔨 mined potential block                  number=1 hash=925c9a..d8cb75
INFO [11-07|17:59:54.026] Commit new sealing work                  number=2 sealhash=865003..0e32da uncles=0 txs=0 gas=0 fees=0 elapsed=1.991ms
INFO [11-07|17:59:54.027] Commit new sealing work                  number=2 sealhash=865003..0e32da uncles=0 txs=0 gas=0 fees=0 elapsed=3.070ms
INFO [11-07|17:59:54.428] Generating DAG in progress               epoch=1 percentage=0  elapsed=3.563s
INFO [11-07|17:59:56.581] Successfully sealed new block            number=2 sealhash=865003..0e32da hash=f1224d..9dc4b8 elapsed=2.554s
INFO [11-07|17:59:56.582] 🔨 mined potential block                  number=2 hash=f1224d..9dc4b8
INFO [11-07|17:59:56.584] Commit new sealing work                  number=3 sealhash=8de6d6..c8886e uncles=0 txs=0 gas=0 fees=0 elapsed="906.417µs"
INFO [11-07|17:59:56.585] Commit new sealing work                  number=3 sealhash=8de6d6..c8886e uncles=0 txs=0 gas=0 fees=0 elapsed=2.271ms
INFO [11-07|17:59:57.730] Successfully sealed new block            number=3 sealhash=8de6d6..c8886e hash=42a018..4e7ef3 elapsed=1.146s
INFO [11-07|17:59:57.731] 🔨 mined potential block                  number=3 hash=42a018..4e7ef3
INFO [11-07|17:59:57.733] Commit new sealing work                  number=4 sealhash=26af07..609e57 uncles=0 txs=0 gas=0 fees=0 elapsed=1.165ms
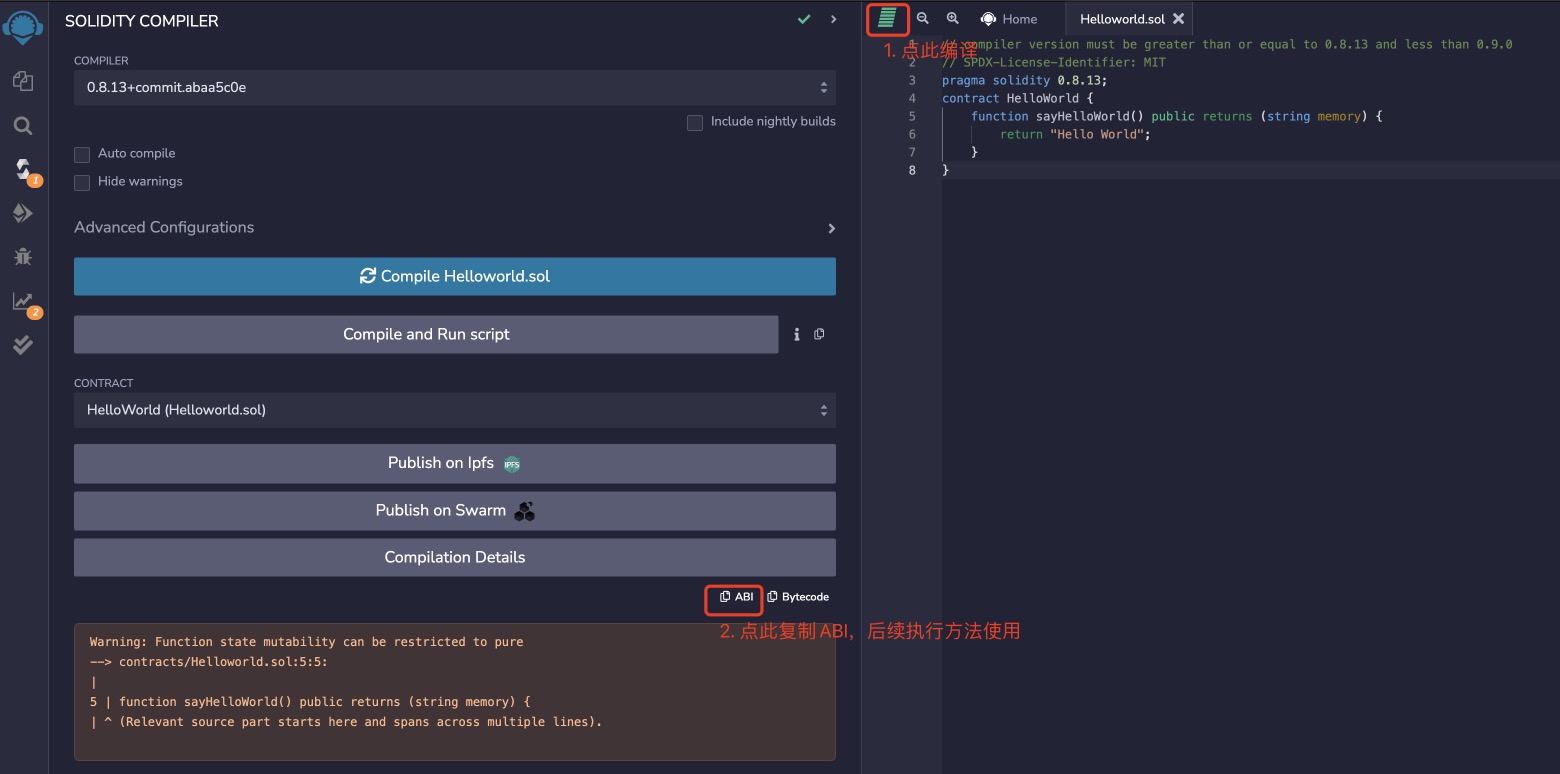
// compiler version must be greater than or equal to 0.8.13 and less than 0.9.0
// SPDX-License-Identifier: MIT
pragma solidity 0.8.13;
contract HelloWorld {
    function sayHelloWorld() public returns (string memory) {
        return "Hello World";
    }
}